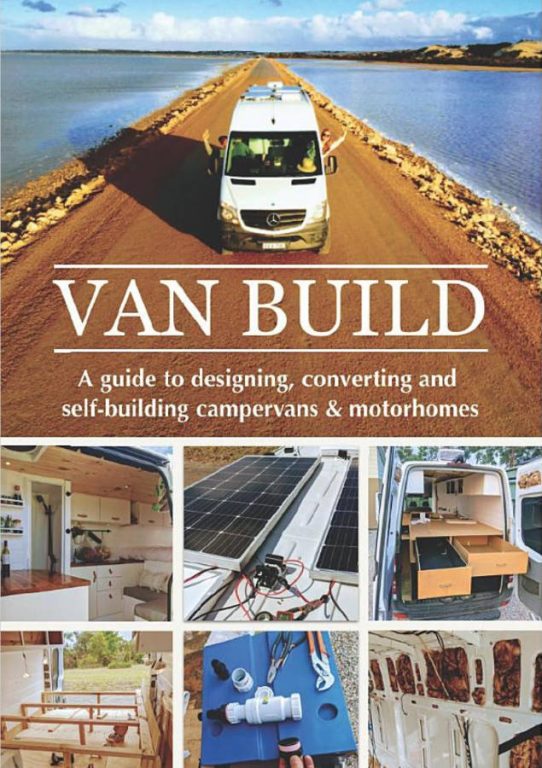
Submitted by rod whirity on Wed, 2014-04-16 15:30
lydia the ldv convoy started life as a 17 seater minibus owned by the probation service,although she is a 2005 vehicle with low mileage of 75000 she has had a hard life cosmetically suffer dinks,dents,scratches and even some very unusual rust patches but these will be dealt with at a later date.I will start the conversion by removing the grotty, smelly,ripped and stained minibus seats,please feel free to keep a check on how my progress goes and offer any help or advise.24/04/2014 I have removed the grotty seats and donated them to my local scrap dealer and made a start on the interior bit of a shock when i removed the inner plastic panels apart from the rubbish hidden behind them was the off side arch is in need of repair due to rust,i will attend to this later but at the moment my priority is insulating the van,to do this i have decided to use 50mm polystyrene panels from my local builders warehouse..i looked at the 25mm first but they seemed a bit thin and would offer little in the way of insulating the van.28/04/2014 Well the welding turned out to be not needed as it was a common fault on the ldv convoy that the outer skin omes away from the inner wheel arch this isn’t structural and a bit of p38 filler put it right,will need sanding and re filling to get a good finish but also you can buy both front and rear fibre glass replacement arches {over arches} for £40 a pair of ebay to tidy the arches up.I have made a start on carpeting the interior panels much to my wife’s annoyance i tried this in our front room whilst she was out and although i put lots of paper down to stop the spray glue making a mess it bonded the paper to our laminate floor..yes angry wasn’t the word,the carpet was sourced from a firm just down the road in cleckheaton it’s great quality and costs £60 for 5 metres and you get 5 spray cans of glue included.This week i have also fitted the 240 volt hook up point to the vans exterior i chose to locate it just behind the drivers B pillar which means it leaves plenty of room on the off side to fit the fridge vent and a gas locker if i choose to add one.02/05/2014 Today was a day of using quite blue language at times..i started it by using some thinners to clean my wifes laminate floor of the glue residue i had left on it when i glued the carpet to my interior panels,once she allowed me out to work on lydia i upgraded the wiring from the hook up point to where i’m fitting the consumer unit {under the offside rear seat} originally i had used an old 240v hook up lead as a donor but on reflection i have changed it to 2.5mm 2 core with earth lead rated at 27 amps this i’m sure will be more than adequate for our needs,I have also attached the side carped panels in permanently now and ,re fitted the rear speakers after painting the covers in matt black i have also run lengths of 2 core wire from the 12 volt feeds these will power the 12v strip lights when i fit them although at the moment it will be via a switch on the dashboard i’m intending to add a switch in the rear living space just inside the sliding door to save scrabbling about in the dark when we return from the pub late at night.My next job is to make the seat/bed frames ive purchased some really nice upholstery from a late adria caravan these are blue and yellow patterned which i think will really lift the interior,one item i’m not going to use is the fixed double bed mattress as i do not have the room which is a shame as its in good condition and folds to give access to the lower storage under the bed,my intention is to use a 2 x 54 inch seat / bunk plan facing each other running parallel inside the rear doors which will become a good sized double bed when needed but be used with a free standing table as our main seating/dining area with the doors giving us a lovely panoramic view of wherever we stop.The kitchen will be a basic sink,and 4 burner hob with a microwave underneath plus a decent fridge i’m playing with the idea of fitting a wine cabinet for her indoors { i’m a lager drinker} 24/05/2014..ok it’s been a few weeks since my last addition to the build i thought i would go down the build my own furniture route so off i went to my local selco warehouse where i purchased 12 metres of 2×2 timber just plained pine to make the frames for my beds and 18mm mdf for the facings and 9mm mdf for the lids of the beds..i will attach piano hinges at a later date . i have made these up to fit the cushions i bought off ebay from the adria motorhome and at first attempt i built them at 15 inches high this turned out to be far to high as the ldv convoy has a high floor so i re built at 12 inches and this seems to be a better height, 25/05/2014..Today i have trial fitted the seating and changed my mind about parallel seating at the rear of the van and instead gone for the seats facing still but behind the drivers seat,this will still give a lovely view via the side door when we are parked up tomorrow i will decide whether i,m going to use laminate flooring or just carpet. 26/05/2014 In the battle of carpet versus laminate floor carpet won !!! i have fitted it and now have the seating in place,this leaves room at the rear for a L shaped galley style kitchen,with storage for a 5 gallon fresh water container and 7 kilo butane bottle under the sink and hob,with a work surface with storage underneath for the kettle,toaster and microwave,instead of a fridge ive bought a rather nice beer cabinet to keep the milk and beer cold and the bacon fresh..28/06/2014 Well it turns out that building an interior from scratch isn’t as easy as it looks,and my attempt wasn’t as good as i thought it would be in my head..so i started again but this time retained the services of a professional carpenter,he re built my bed units and built my kitchen from scratch for me at a very reasonable cost,i took lydia for her mot and she passed without a hitch,i was surprised to find the tax was just £90 for 6 months,so she is road worthy and apart from a couple of finishing touches is nearly finished..i still need to wire up the sockets,fit curtains and give her a lick of paint..and i have decided to have some overhead units fitted in the kitchen and a large unit above the cab this will be ample storage and will have the tv fitted to it.
Album Type:
Campervan Conversion Pictures
097.JPG
098.JPG
094.JPG
096.JPG
092.JPG
100.JPG
103.JPG
062.JPG
059.JPG
058.JPG
049.JPG
048.JPG
002.JPG
045.JPG
004.JPG
007.JPG
046.JPG
001.JPG
002.JPG
011.JPG
010.JPG
009.JPG
013.JPG
009.JPG
012.JPG
002.JPG
003.JPG
001.JPG
004.JPG
007.JPG
005.JPG
009.JPG
005.JPG
004.JPG
003.JPG
007.JPG
001.JPG
003.JPG
009.JPG
006.JPG
007.JPG