In 2006 I converted a cheap Mercedes Sprinter 208D van into a comfortable campervan. I had no previous experience, but found enough information, and used enough imagination to make a lovely little campervan. I packed away my possessions, and took off on a road trip, expecting to be away for 2 months. I came back 9 months later. I was hooked on campervan’ing.
I created www.campervanlife.com because I thought people might find the information about that campervan and my 9 month trip useful.
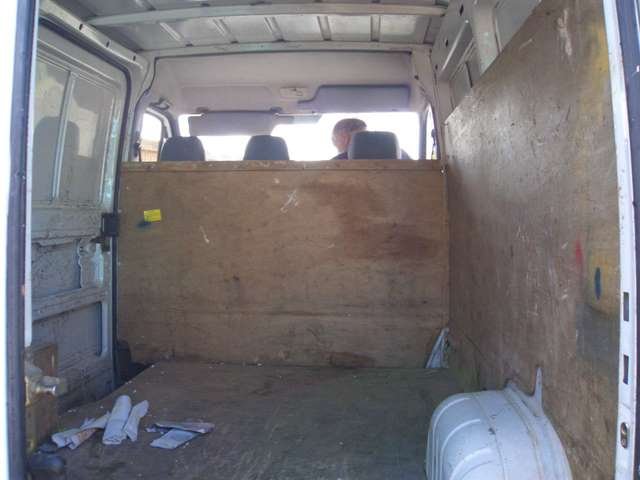
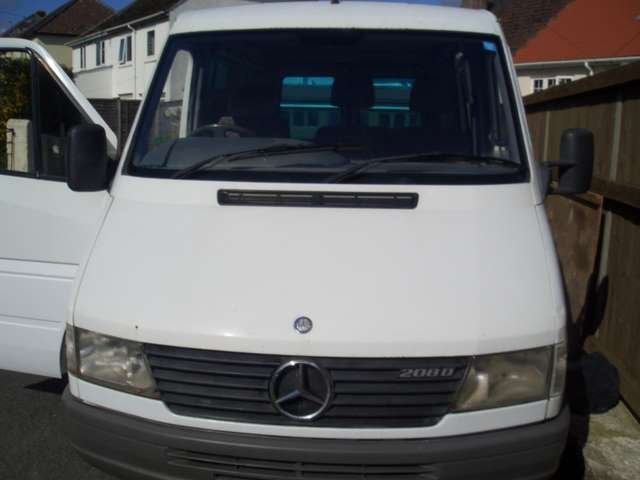
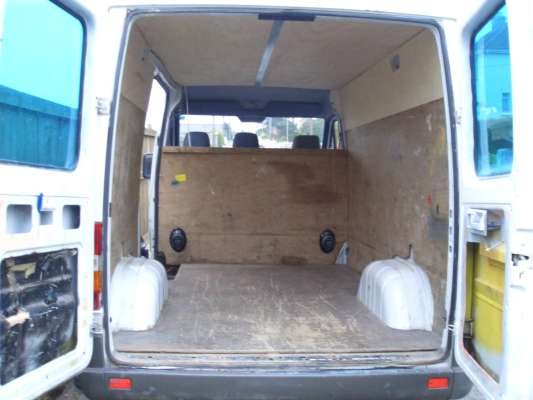
This is the van when I bought it.
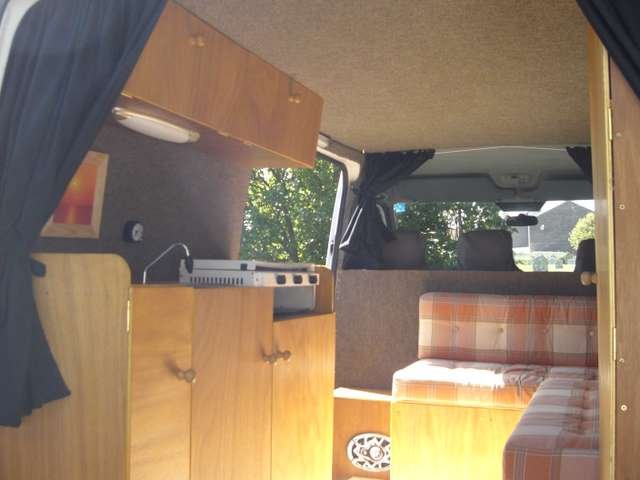
and this is how it looked when I had finished converting it.
Read about what I did and why I did it.
- Photos of the conversion
- Summary of Darren’s 2006/2007 European trip
- Photos of the trip
- Darren’s blog (of the conversion and the trip)
- Costs of my trip
Why build a camper van?
I never actually set about to build a camper van. In 2005 I started surfing. I have always lived in Cornwall in England, where surfing is popular, but never really got into it until 2005. I quickly became hooked. I used my BMW 318i car, but it was less than ideal. I couldn’t fit my mini-mal board into the car, so it had to go on the roof via soft roof racks. If you’ve every owned or used a 318i you’ll know that whilst they are a pleasure to drive, you can’t fit a lot in them as they are saloons. Volkswagen vans are very popular amongst surfers, and the thought of owning a van appealed to me greatly. As did the idea of travelling with my surfboard. I have always loved travelling, and especially like road trips, after having spent a year driving around Australia in 1998. As the summer of 2005 ended and autumn started the weather got colder. After surfing I would change from my wetsuit into my dry clothes are various locations around Cornwall’s beaches, and always in the increasing cold. I always wished that I had a van, so that I could change in the van, and have a warm drink afterward. I injured my finger badly whilst chopping firewood at the end of 2005, which bought my surfing to an abrupt end for the year.
The winter of 2005/2006 passed, with me preparing to go travelling to South America and South East Asia in 2006. April came and I decided to stay in Cornwall for the summer, as I was self employed and the additional income of the summer would be great for my trip. I started surfing again. The water was cold and the idea of a van appealed greatly again. I decided to buy a cheap van, just a van, to allow me to enjoy surf trips more.
Which van?
The popularity of all Volkswagen vans has driven their cost up greatly in Cornwall and Devon, so much so that they are no a realistic option. T2 and T25 vans are not my sort of thing anyway. They look cool, but they are a bit dated technology wise for me. I have good mechanical skills, thanks to my dad any many jobs on farms and golf courses. I wanted a diesel engine vehicle, no older than 1995 really. And one I could almost stand up in, rather than having to sit down in constantly. I was prepared to go to the south east of England to find a cheaper VW T4, and also a Mercedes Vito, but both these vehicles are low in height, and it is not possible to stand. My BMW car had impressed me so much in terms of build quality that I was tempted by Mercedes vans. Mercedes vans have always been very popular amongst travelers. In early April 2006 whilst still thinking about vans I saw an advert for a SWB 1995 Mercedes Sprinter in Plymouth, about 50 miles away, for £1,100. Market value for a good one was about £2,200 so it was obvious it was not perfect. I ‘borrowed’ my dad for the day and we caught the train up. My Dad was a Royal Engineer in the Army, and Engineer by trade, and has a good eye for things.
We got to the garage and the guys where helpful. The van was a little tatty, but not too bad. I took it for a drive and it drove well. A few rattles, but everything was straight and there we no wobbles. The radio didn’t work, and it needed 2 new rear tyres and a new exhaust. I had a good think and bought the van for £1,000. I drove it back to my Dads without any problems. The van was a 1995 model, 208D, with 185,000 miles.
What to do with the van?
Initially I had just wanted to tidy up the van and have something useful for surfing. Somewhere I can safely store my board and somewhere to get changed, out of the cold wind. The van was filthy and needed a few jobs doing to it. I cleaned the van thoroughly, gave it a good service and fixed some broken bits.. It was clear that the van had been used for building maintenance, gardening and car boot sales.
After some serious consideration I decided to convert the van into a camper van. Having a camper van for the summer would be great. I would be able to take little trips with it and it would make surfing trips much nicer. I did lots of research looking at professional and home made camper vans.
I had no or very little DIY skills. I did not know how I would make any of the furniture, add any plumbing, fit the carpet, or just about anything else. But I am a quick learner and am good at things I apply myself to. I decided to add some form of seating and a kitchen area, which would go over the wheel arch in the back.
New CD player and speakers

I removed the existing cassette/radio to find it was not even connected, and hence why it didn’t work. I connected it but it didn’t work. I love music and having some music whilst building the van was very important, as well as afterward. The speakers in the dashboard were rubbish, so I needed a new CD player, one that played MP3 discs, and some new speakers. I went down to Flying Sparks, a local supplier, and got a great deal on a Clarion CD player and four 6 x 9 speakers.
My Dad and I fitted the CD player, and two of the 6 x 9 speakers to the bottom of the bulkhead, facing in towards the cab. This was the position suggested by the guys at Flying Sparks, and made the most sense. The stereo is loud and sounded pretty good for a van.
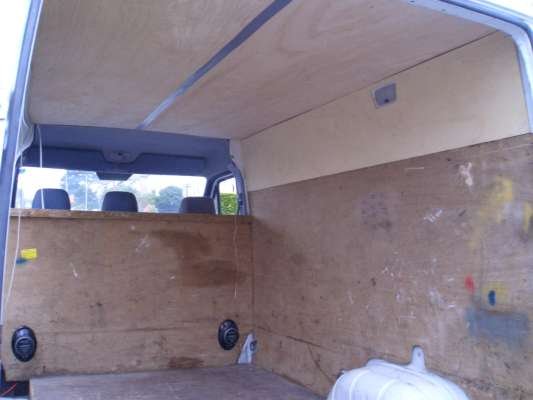
Ply lining the back
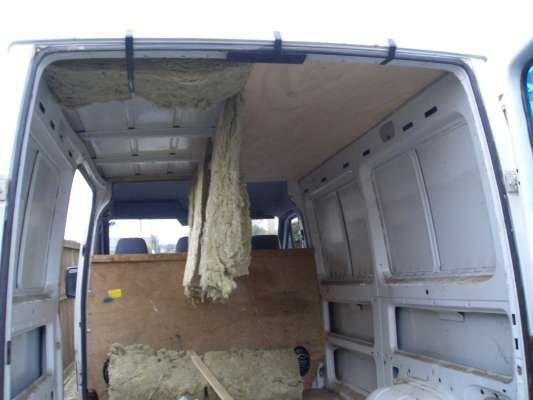
I decided to insulate, line and carpet the back of the van. This would make a nice cosy area. The van was already 3/4 ply lined in the back. My dad and I removed the lining and insulated the walls and ceiling. We used regular loft insulation wool. This is cheap and easy to manipulated into any shape. It is important to ensure it does not all fall to the bottom of the area you are insulating though.
We then covered the entire sides and ceiling with 9mm ply wood. 6mm would have been better, but 3/4 of the sides where already done with 9mm ply, so we used the same. The ceiling was tricky, eventually done with 2 panels. We cut around the lights in the back, so that they came through the lining.
We also installed wiring to the back, inside the paneling for a 12v fridge, and a light. I wasn’t sure where these would go, but left the wiring in a suitable place. If they were not used it would be easy just to loose them behind the paneling. Adding the wiring afterward would be very difficult. I also added a waste water connector with flap to the wheel arch. The kitchen waste would connect to this internally, and allow a hose outside to be connected to the wheel arch, and then to a waste container on the floor.
Carpeting the back
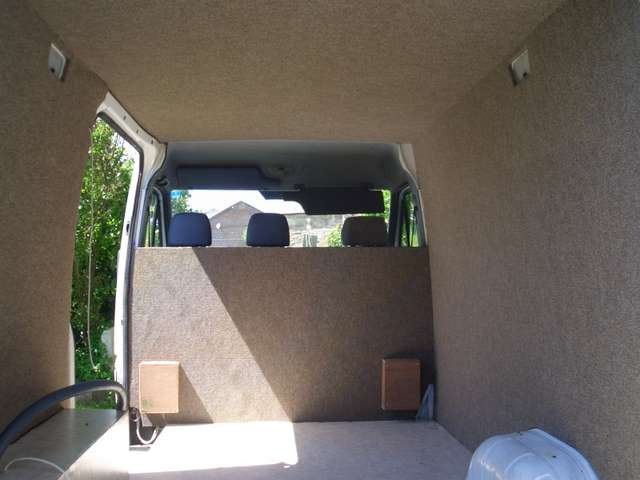
I decided to carpet the back of the van to make it a lot cosier to be in. I went to Trago Mills, a local business that sells just about everything you can think of, but in a warehouse kind of style. They had a remnant (off cut) piece of carpet that was just about the right size for the back of the van. It was in a nice brown colour, had a rubber back which was perfect for gluing to the walls. It cost about £30.
I took out the wooden bulk head and cut some off the top, as it was too high. I painted the cab side with a water resistant paint, in a colour similar to that of the cab plastic. I carpeted the side that would be inside the back.
I cut pieces of carpet to fit the ceiling and walls. Leaving about 10mm of extra on each side. I used contact adhesive (Evostick at first and then a much cheaper brand, which was fine) to stick the carpet to the ceiling and walls. The ceiling was done in three strips eventually, to avoid mistakes. My mate Jess helped me with sticking the glue coated carpet to the ceiling and walls, as it is a tricky procedure.
Once the glue had set I used a stanley knife to trim the excess carpet from each panel. More glue was used to stick down the edges where necessary. I got some 6mm ply and made some panels for the 2 rear doors and side sliding door. I carpeted these panels and screwed them to the door.
I bought some vinyl flooring from Trago Mills. I fitted it to the floor of the van. I didn’t stick it down at first, I took it back out and continued working so that it would not get damaged. With the excess I covered the box that had been made by someone else to go over the wheel arch. My kitchen would cover and incorporate this in some way.
I made some simple boxes to cover the rear of the speakers that came through the bulkhead. This was to stop anything metallic sticking to them, and also to stop anything puncturing the speaker cones.
Seating
I spent many hours looking around for caravan seating foam. Foam is expensive, and shipping costs are high should you need it delivered. I tried local caravan breakers but they weren’t very helpful. I bought some seating foam cushions on eBay. It was a set from a caravan or camper, and had a corner piece so that seats could be arranged in an L shape, which I was hoping to do.

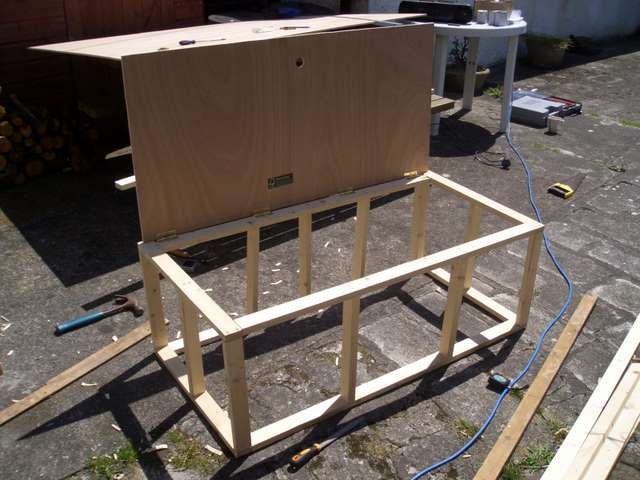
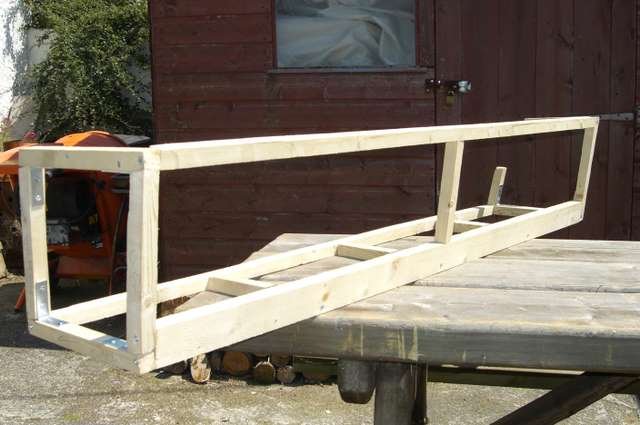
With the cushions I could now make the seating furniture. I decided to make 2 bases, with hinged lids which would allow storage underneath. I made the frames out of timber, and the top from 9mm ply. 9mm ply is strong enough to not need any support in the middle. I made the top smaller than the size of the frame to ensure the top would open easily without catching on surrounding cushions. I attached the top to the frame using hinges. I recessed the hinges into the timber and the top to allow a snug fit when the top was closed. I also made the hinge sit away from the back of the frame to allow the top to open without hitting the wall.
I tried out one seat and was happy with it. I made the second in the same way. With the second base I made a second top, which hinged to the first. This would be the bed section. When folded out it would make a double bed. The hinged lid would make it fit well. When folded away it was not easy to spot that one seat was higher than the other.

I screwed the seating frames onto the walls and floor. I measured and cut 9mm panels to fit the front and sides of the seating frames.
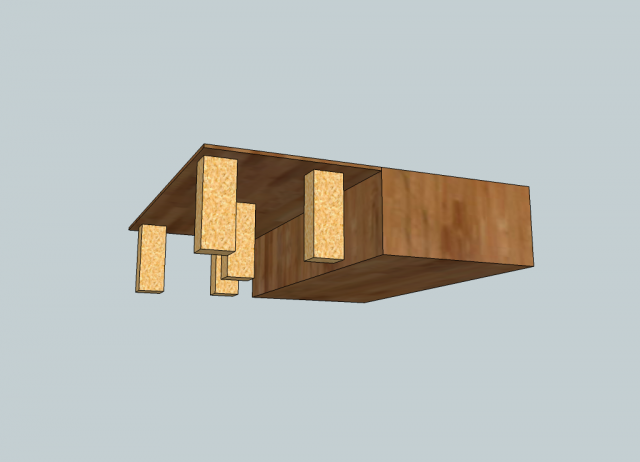
You may be curious how the fold-out top of the seat was held up when being used as the bed? I thought about several ideas, which all seemed complicated. I settled on the simplest and cheapest option. I bought a thick fence post, about 3 or 4 inches square, and cut it into 5 lengths that would hold up the top at the right level. I stored these 5 lengths in the seat box. When it was time to make the bed, I would get them out, place them on the floor as seen below, then fold the seat top out onto it. It work perfectly, and never went wrong.
Kitchen
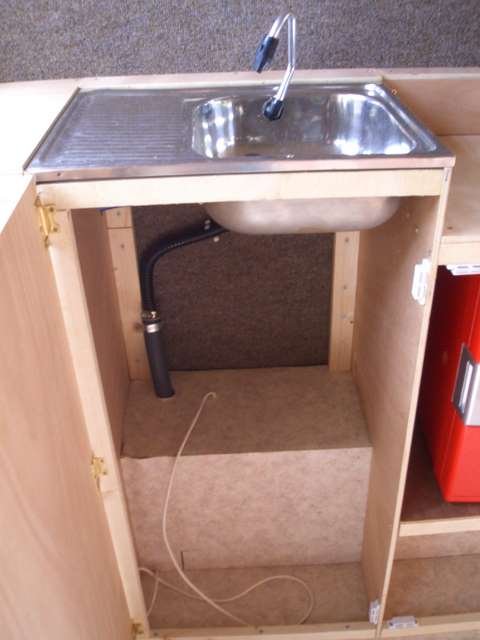
I wanted a basic kitchen area with fresh water, a sink with running waste water, a fridge and a gas stove. I didn’t want to fit a gas fridge as I didn’t like the idea of it being on all of the time. I got an electric fridge and leisure battery for £45 from a guy in St Austell. He had made a camper van with a Sprinter, although a much bigger one, but the engine had blown up, so he was selling the bits from it. He gave me a Haynes manual to motorcaravans.
My friend Jess has a gas stove I could borrow. It was old and filthy from being stored in a garage. I cleaned it all, wire brushed it and painted it with hamerite. I bought a sink from a VW T25 for £5 on eBay. I bought a foot whale pump for the fresh water from eBay also. The foot pump allows one to pump water and use both hands in the sink, which is very useful.
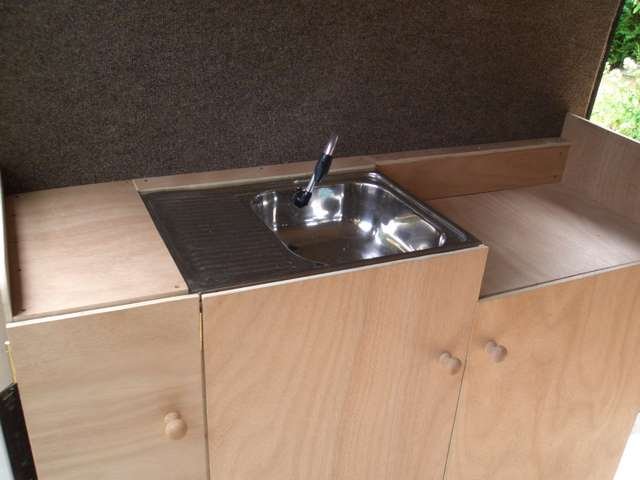
I measured everything up and made a basic design. The fresh water tank would sit in a cupboard to the left, with the foot pump underneath. The sink would sit to the right of this, with a cupboard holding the gas bottle underneath. To the right would be a recess for the stove. With the fridge underneath in a cupboard. The frame would be timber, and the paneling would be 9mm for strength and to avoid warping on the doors, which can happen with 6mm.
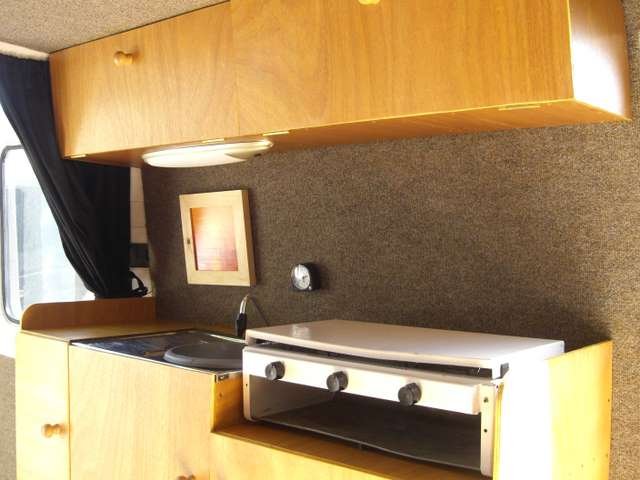
A gas bottle was fitted and secured using straps. The sink waste pipe was connected to the flap in the wheel arch.
Leisure battery and circuits
I bought a fuse box, a caravan split charge relay unit and a battery meter to go with my leisure battery. I also bought two lights to go inside the back of the van. I fixed the leisure battery under the passenger seat. The split charge relay unit was used to charge the leisure battery when the ignition was running. The split charge relay unit also had an output for a 12v fridge. I used this to allow my fridge to be run when the ignition was running. I also added a switch to allow fridge to be run from the leisure battery also, for example when parked. I changed the CD player wiring to use the leisure battery. I added one of the two lights. Each electrical item had its own fuse. Including the battery level meter. To increase my battery power when parked up for long periods of time I bought and fitted 2 additional leisure batteries. These where connected to the first in parallel, simply making a ‘battery bank’ from the first leisure battery. No other wiring needed to be changed.
Book cupboard

I wanted to add a small book cupboard to the side of the seat by the sliding door. This cupboard would cover the speaker showing through the bulkhead, use up the space here, and provide an extra seat should the van be busy socially. I made the basic frame. I added 6mm panels to the sides, including one of the speakers that would face into the back of the van. I added a hinged 9mm top. I added the second speaker to the seat running along the side of the van.
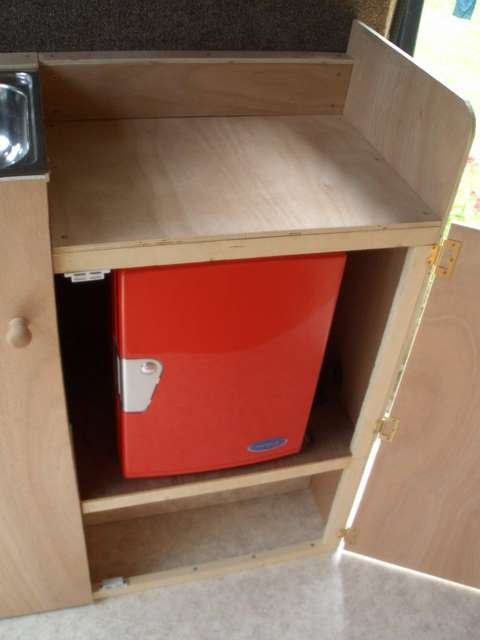
Tall cupboard

I decided to add a tall cupboard to the end of the side seat. Initially I wasn’t sure whether to leave the cupboard as a short one, to allow more light to come in and a surfboard to be stored against the wall, or to make it full height to the ceiling. I decided on the later for maximum storage. I measured and added one 6mm side the wardrobe. The van walls and ceiling both slope so a lot of trimming was required to make the side panel fit. I cut a second panel for the cupboard. Both sides where secured to the walls.
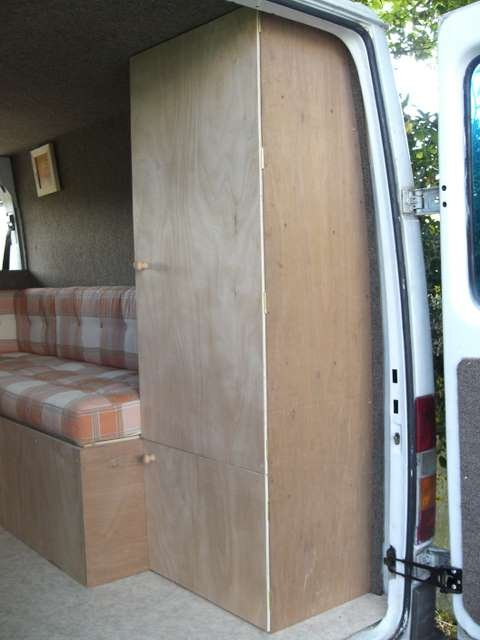
]I added various shelves with different heights between the shelves. I added a timber stop to each shelf to prevent things from sliding out. I also fleeted the shelves downwards towards the back, to further prevent things sliding forward and against the door.

I fitted the 9mm doors. A larger one to the top and a smaller one beneath.
Overhead cupboard
I wanted to add more storage and use the space above the kitchen. I carefully measured and made a frame for the cupboard. I used L shape brackets to add strength to the frame (thanks for the tip Trev). One end of the cupboard would sit around the sliding door aperture, which came away from the wall. So the frame had to be made with this in mind.
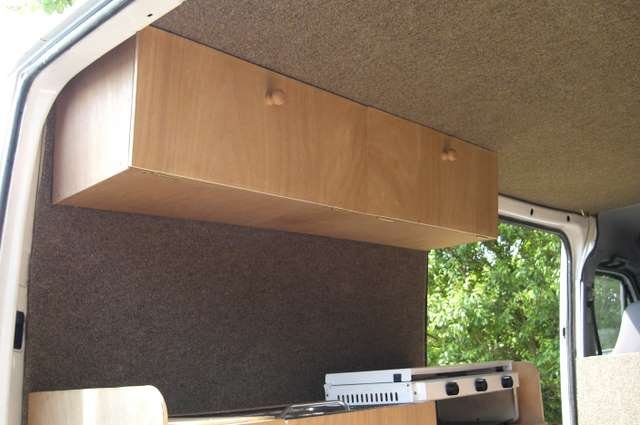
I screwed the frame to the wall. I cut and fitted 6mm panels to the sides and bottom. 9mm doors where fitted to the front. I added one of the 12v lights to the underside of the cupboard, but away from the stove where heat and steam would be generated.
Varnish
The furniture was now finished. I decided to varnish the ply wood to protect it and to give a nice finish. The 6mm ply was darker than the 9mm, and the varnish would help to blend the two together.
The kitchen area and overhead cupboard had 3 or 4 coats of varnish, to provide maximum protection from splashed water and steam from cooking. All other plywood had 1 or 2 coats.
Extras

I wanted to carry a surfboard in the van, up against a wall. So I got some door handles and screwed them to the wall. This allowed bungee’s to be used to attach the board.
Curtains
I added net curtain cables to run curtains on. I bought some thick black curtain material from eBay. I wanted to make curtains that would completely stop light coming in or out. From the outside the van looked like a regular van, there was no sign of it being a camper van. I wanted to keep this, as it was a great security feature. This later become know as a stealth camper. I didn’t want any light escaping from around the curtains to give away the fact that it was a camper van. My dad gave me a revision lesson with the sowing machine and between us we created some curtains and tiebacks. Velcro was sowed to the sides to allow it to be stuck to the carpeted walls.
The Pampy Camper
The van affectionately became known as The Pampy Camper. I became known as Pampy, due a knack of always having what everyone needed at any given time, oh, and a granddads car rear seat blanket. As my camper van, the van simply became known as The Pampy Camper.
Weekends and surfing
The van was used regularly at weekends and during the week for nights away, barbeque’s and surfing trips and at festivals. It was great to have somewhere warm and cosy to retreat to.
Things I wished I had done
There are a few things I wished I had done to the van
- Added a roof vent – as I do not have any windows in the back I wished I had added a roof vent to allow air to run through when the door is shut. I think this would have been fairly easy to add, and wouldn’t compromise the security, or stealth camper status of the van. My house mate Adam had suggested adding a circulating vent, which would have been a great idea. Wished I’d listened Ads!
- Used black 1-way tinting rather than silver on the rear doors. The silver attracts attention, whereas black would not.
Things I wished were different (but chose not to do)
- A window in the sliding door – having a window (an opening one) in the sliding door of the van would allow air to move around in the back when the sliding door was shut. I chose not to do this as this would indicate that the van was a camper van, and I wanted it to remain looking like a regular van, for security purposes.
- Walk-through into the cab – I wish it was possible to walk from the back into the cab. I chose not to do this because of the cost of getting a single passenger seat to the replace the double. if I had got the single seat I would also want to make it swivel around. I decided on the design I have as it fits my needs well. I do not need the extra seating of the swivel seat. It does annoy me that I have to learn over to adjust the CD player though.
Europe 2006
After closing my business I decided to go on a surfing trip through France, Spain and Portugal with the van. I am writing this from a mountain in Spain’s Picos de Europa. I have done over 2000 miles, and have done nothing more than add a drop of oil to the engine. I’ll let you know how it gets on below!
- 6th September 2006 – I leave Cornwall
- 8th September 2006 – I get to France
- 3rd October 2006 – I wrote this page from the mountains of Picos de Europa in Spain
- Late October – I get to Peniche in Portugal
- Late November – I leave Peniche, having stayed there for a month
- December – February Mostly in the Alentejo and Algarve, Portugal. I also spent a weekend in Porto and a week in Lisbon
- March – After spending the Winter in Portugal I head to Andalucia in Spain. The change of environment is just what I need. I meet lots of people and spend 6 weeks there.
- April – Back to the Algarve and Alentejo of Portugal
- May – I drive from the Algarve to Madrid, and then onto Barcelona. It is an amazing journey with many landscapes.
- May – A weekend at he Spanish Grand Prix, then back to the North coast of Spain
- June – Back home to Cornwall, after 9 months of traveling.
- July – August – Summer at home enjoying the van
- September 2007 – I sell the van to my friend Rich. I will spending the winter backpacking, and want someone to be able to use the van.
Another van in the future
I will definitely convert another van in the future. Doing the conversion, and using the van are both fun. This van is fairly large which is great for storage and living in whilst in Europe. However it costs more than a small van in fuel and in parts in General. Driving it is not much of a problem as it is easy. However, for surf trips and as my primary vehicle I like the idea of converting a car derived van such as a Peugeot Export. There are several other similar vans made by Fiat and Citroen. These vans are based on a car chassis, and drive just like a car. Brand new diesel empty ones do 50mpg!
I like the idea of fitting an ‘across’ bed, just like in a VW, that folds out. I would not add running water and a sink, but would rather just keep a can of clean water and a bowl.
If however I find myself doing another trip like my European trip then I might make another big van conversion. there are so many possibilities.
Questions and Answers from people
The roof panels were 9mm ply wood bought from a DIY store. I would consider using 6mm next time as it’s more flexible, but 9mm allows heavier things to be screwed/secured to it. It wasn’t too difficult to cut the panels into shape.
The roof panels were secured to the metal battens already going across the ceiling of the van, using self tapping screws. I know a lot of people have used very strong adhesive to secure wood battens to the ceiling, and then screwed wood panels to that.
At first the insulation was fine for moisture, but I didn’t check it after prolonged time spent in the van.
Cheers
Darren
Wiring and Gas installation in a campervan.
Firstly, what a great job you’ve made of the van, I hope I can get near the standard that you have in your van. I’ve been thinking about building a Campervan off and on for about 18 months, the stumbling block for me is the Electrics and the Gas installation, did you find this difficult ?, it sounds like a daunting task. I’m confident about the paneling insulation and the building of the beds and general storage units.
I’ve narrowed the choice of van to a Sprinter or a VW LT as I borrowed an old T4 2.5tdi and found it to be a very economical vehicle.
People have suggested a Renault Master which would be more rust resistant but I’m not very confident that it would be reliable.
Any advice regarding the choice of van or the Electrics and Gas would be much appreciated.
Camper
I’m looking at doing the same with a Sprinter LWB high roof, i enjoyed reading this and it’s given me some new ideas and conformed some i already had. I work as a photographer all round the UK so this sounds ideal
Hey mate, nice page. Thanks
Hey mate, nice page. Thanks for the share. I’ve been nomading around the u.s. for about four years. I started with a big Chevy van that wasn’t very efficient on petrol and later moved on to a Hyundai and a hammock. I’m currently purchasing a sprinter hitop to tour in this winter. Did you calculate your om/hours for your electrical system? If so what amount did your usage run? I’d prefer to go solar over a generator, but it seems hard to find realistic data to design around. Thanks. Stay warm.
Approximate conversion time
Hi Darren
Absolutely stoked to stumble across your blog, thanks, it’s already answered some of my questions…but there remain a few.
Basically I’m a young South African who’s just committed to a 6 month training period in Vienna. I’ve been led to believe that while there I’ll be given a small living allowance, which will be paid in Euros. With the exchange rate hovering around 13 Euros to R1 I’m sure you can appreciate my eagerness to save as many as possible.
While doing a bit of browsing to get an idea or cost of living and accommodation (and getting depressed) I thought it would be pretty neat to buy comparatively cheap living facilities that I could sell when due to return to South Africa, hopefully recouping most of what I’d have spent on accommodation. Then the idea of a camper van occurred.
Dates and all are still in the air so I’m not sure how much leave time I’d be able to wiggle before I get there. Ideally I’d like to do a conversion instead of buying a pre-made van. I have a friend living in Germany and I thought it would be fun to maybe stay at her place for a little and purchase a Sprint in Germany, convert it and then take a road-trip to Vienna. But what I don’t really know is what sort of time frame I should account for converting. If you could give me some idea that would be great. I had something like your Pampy Camper in mind, just with my own twists.
I’m quite tall, about 6 foot 3 I guess, would you suggest a high top. How much extra would it cost and then is it worth it. alternatively, do you have any insight on a pop-up roof conversion?
All my questions are stacking up so I’ll leave it there for now.
Any insight would be of great help.
Thanks
High-top!
Hey Lost Marbles,
I just thought I’d throw my two cents in. 🙂 We are in the process of buying a Sprinter van as well and whereas I’m only 5 foot my husband is 6’1″, we stepped inside a regular top and decided immediately that we need the high-top — otherwise he’d be hunched over to do anything. I say get the high-top you’ll be much happier, plus you can raise the bed platform higher and have more storage space.
Hi guys I need information ,
Hi guys I need information , I got sprinter with 3 seats and I want to add 3 more seats extra on the back and side window can somebody tell me mobile number or same garage to do this ,thanks and good camping
HInges in 9mm board
Excellent site. Can I just ask what type of hinges you used you used with the 9mm board. I’m planning to use 9mm baord to add some doors for my cupboards as I have a couple of spare sheets left but I’m worried it might be a bit thin to screw into.
Thanks
Graham
Hi Graham
I had the same
Hi Graham
I had the same problem and ended up filing down the screws to ensure they didn’t stick through the 9mm board.
van conversation
Hi Darren!!
My daughter and I want to have a campervan but not sure if we can convert on our own. I checked out the vw westfalia but heard some bad review. Anywho, I have the tools and from your diagrams this might be a project that me and my daughter can do. Believe we can build the cabinets, bed, etc., however, not sure about the electric and the gas stove.
Any help would be greatly appreciated!
Doreen
Doreen. Have a go and see
Doreen. Have a go and see what you can do. You might be pleasantly surprised. Take your time.
Your homepage
Nice homepage with a lot of info. My camper is a Mercedes 408 build as a firetruck in 1967
Leen, from the Netherlands
Shower room
Hi Darren. We are converting our Sprinter and I have used you website constantly for reference. It has been fantastic to find so mush info on one site. At this point I have to start with the walls and door of my shower room. Can you advise me on what product to use as a cladding for the ceiling, walls and door so as to get a waterproof interior. I am looking forward to hear from you.
Pete-row
Hi Pete-row
Glad the website
Hi Pete-row
Glad the website has been useful to you. I used vinyl flooring on my second Sprinter. I bought the cheapest and thinnest vinyl flooring I could find. It was easy to cut to shape. It takes quite a bit of glue to stick to the ceiling and walls, but works really well.
Other people have used waterproof wallpaper, and plastic sheets, which are designed for shower cubicals , but the later can be expensive.
Hi, I took your advice and
Hi, I took your advice and used a cheap, thin vinyl for the shower and it worked fantastic. Thank you very much. Our Sprinter is nearing completion and I am going to post some photos once I’m done.
Regards
European Camper
I have enjoyed reading all of your conversion details and the ensuing posts. I drove my 208 coachbuilt to Crete (apart from the wet bits) 18 months ago but became concerned when I heard Greek customs impounded ‘foreign’ vehicles which stayed more than 6 months so July before last I drove it home. I was going to bring a cheap car here instead (cheap enough that if it were impounded it wouldn’t matter) but not having a camper here spoiled the overall experience (I have a house here so it was not absolutely essential. I was very lucky for on e-bay I spotted a Mercedes 207d camper that had beed fitted with a 208 basic Sprinter engine (so will run on 100% veg oil). It has a fitted high roof with a slide out 4’6”x 6’6” bed with futon matress (which rolls up) in the roof space. The head room is only a couple of feet and less at the foot end (front) and getting in is a bit acrobatic for a 64 year-old and a tallish partner but once in we get a wonderful night’s sleep (there is a proper roof vent above our heads and non-opening side windows. Downstairs is a rock and roll type wooden slattet seat which unfolds onto an opposite fixed seat giving another double of 4’x 6′. I fitted this latter arrangement and also put in a decent slide out upper base and the futon, but everything else was already ‘in’ and it is registered as a Camper.
It has a 3-way fridge, 4 burner stove and grill, a full oven, gas/mains water heater, 12v water pump, shower and loo (both usable although you wouldn’t want to sit reading for long!) Yes it is old, but it sailed through its last MoT and got here to Crete without any problems – in fact it really is an ideal camper in so small (SWB) a van that I would hate for it to be impounded. I have heard that if customs do impound your van they put Greek registration on it and then auction it. As putting it on Greek plates with cusoms duty etc would cost more than £2000 and nobody here would buy a RHD vehicle (so the chances are I could buy it back for less than importing it properly) it is almost tempting to wait and see. Anyway if any readers are cosidering a trip to Greece and particularly Crete I would happily give advice. My van, by the way, is insured any driver over 25 so I would even loan it to the right people who want to tour Crete. Happy days!
sliding door
Hi Darren,
Absolutely great conversion! I’ve got the exact same van but 2000 reg, which I’m just starting to convert (with absolutely zero prior experience)! Just wondering what you did with the sliding door as there aren’t any pictures of it? I’m trying to figure out did you just insulate and ply-line it the same as the other walls? Oh and also how easy was it to install the leisure battery under the passenger seat? Was that metal fitting relatively easy to remove? Many thanks 🙂
Hi
Yes, just insulated and
Hi
Yes, just insulated and ply-lined the sliding door. Also recessed a carpet covered panel on the top section. No insulation on the top though.
The leisure battery was easy to install under the seat. I don’t remember much about it now though. It was a few years ago. I have a newer sprinter now, and have 3 leisure batteries under the passenger seat.
Great stuff Darren
Just bought an Iveco LWB myself and am looking for information as to how and where to start, hence stumbling across your blog. What a great source of info! I am coming up with challenges quicker than answers right now. The insulation tip was useful, although my situation is slightly different in that I have a fibre glass roof. Cheers again for the info.
Regards,
Lee.
insurance
hey darren im planning the same trip and would like it to be as long as yours actually, you said you stayed for 9 months, what about insurance on a van just registered as a van? isnt that what you had? but then i read other posts you said there is campervan insurance for longer periods, is that what you used if so how did you get that with out registering/modifying your van as a campervan with the government? i can only find insurance for 3 months in europe and thats only for the van, no contents at all, i cant find that anywhere, but that is what id like as i have quite a bit of money in boards and other things in the back, i have just a van set up as a camper inside and a van on the mot and insurance, i know if i convert the van i can get campervan insurance but i dont want to do that. any help would be appreciated, leaving all that stuff in the back in places i dont know of makes me pretty nervous, if it were insured it would be a big load off my mind.
thank you,
john.
Hi John
This is a tricky
Hi John
This is a tricky situation.
Unless your van has the requirements of a campervan – water tanks, side windows, double bed, you won’t be able to insure it as a campervan.
The policy I used 6 years ago doesn’t exists anymore.
You really need van insurance, than covers trips longer than 3 months, and covers your contents.
Try http://www.campton.co.uk. They are a broker who know the policies available. Good people.
Awesome one
When I see this blog it’s a very marvelous. All information is a car renovation. I feel to ambitious to myself too, when I read the blog. Probably I can make it myself too. Give me time and I will also upload my own version on renovating my old volks… 🙂
carpeting the ceiling
hello there,
i have just been admiring you build and how well you have carpeted the ceiling.
i was just wondering how you managed to do it and make it look so neat? could you tell me exactly how you did it, if you dont mind because im finding very difficult to do it on my own build,
cheers kai
Hi
The carpet is thick and
Hi
The carpet is thick and heavy, and I couldn’t do the ceiling in 1 go. So I cut the carpet into 3 pieces, down the ribs in the carpet. Then put contact adhesive on the ceiling, and on the back of the carpet.
Then I stuck each piece into the ceiling. I cut the carpet too big, then once the glue had stuck the carpet on the ceiling, I trimmed the excess with a knife.
I was able to re-join the 3 pieces of carpet on the ceiling no problem.
I have done another campervan and have used much lighter carpet now, and did it in 1 piece.
looks great mate – well done
looks great mate – well done
ASTRA van
Hi Darren,
I’m a new owner of a 54 plate 1.7cdti astra van (small i know) and was wondering if there were any options of a conversion- space for some kind of matress and little storage thats it? the volume of the van is 1.6metres, load length 1,701mm load width 1,371mm and load height 886mm. I wanted to know in your experience if it was at all possible or is just too small, do you know of any converted?
ollie
Camper conversion
Hello.
Firstly, thanks for your detailed pictures and explanations, they really highlight just how straightforward conversions are. Plenty of planning and preparation is the most important thing I assume?
I am saving to buy a van for converting into a camper. Although tempted to go down the ‘stealth’ route, I think I’m going to have to fit a couple of windows – although mind you, some vans nowadays do have windows – the ‘Crew vans’ for example. The roof vent is a good idea though…
I’m going to have to get a high top van – have been looking at a LWB Fiat Ducato, I’ve driven a few of these before now, and I’m happy enough with them, and parts are cheap for ’em.
I’ve got so many different layout ideas buzzing around in my head, but thinking about a similar L shaped sofa/bed as yours with as much storage as possible – you can never have too much surely?!
Just thought I’d add…
I currently drive a Renault Kangoo van for work, which I have ply lined, shelved on the drivers side and fitted with a full bulkhead (to stop a hammer killing me when I brake hard!).
I am 6 foot 5, and the back of the van is way too small for me to use as an overnight camper. If I removed the bulkhead though, maybe it would just be achieveable, but very cramped!
Pat
Beautiful
What a beautiful conversion! So tastefully done! Thanks for sharing it. I hope you’re having a blast!
light height restrictions
sorry to bother you but i am unsure that if a campervan was built in 1979 without top lights at the front {white} and red lights at the back and somebody has added them after” will i be able to take them off for test…. i have looked all over on the internet but unable to find any rules on this matter the vehicle is a 1979 bedford cf ive been workin on it for 8 months and hopefully goin for test begining of march.. thanks kenny….
If the lights work and are
If the lights work and are legal, then I would leave them on. They should pass the test.
If the van has other front and rear lights (white and red) then you should be able to take them off for the test.
top lights
thanks for the info darren it helped.. i would need to strip the inner back wall out to get the lights to work i must have trapped the cable when puttin the back wall in so as the body work is nearly done i may as well take them out …cheers anyway
Hopefully starting on a swb
Hopefully starting on a swb low roof transit in the new year…any pre-op comments gratefully received..!!!
Plan as much as you can. And
Plan as much as you can. And make as much use of the storage space as you can. And enjoy it 🙂
By the way,did you
By the way,did you re-register it as a camper,re-mot it and all the rest…any info there pal..cheers!!!
Hi Blackiie
No I didn’t
Hi Blackiie
No I didn’t re-register as a camper. For that the vehicle needs side windows, which I didn’t want to do.
Once it is re-classified though I don’t think you need a new MOT.
Nice blog mate…nice of you
Nice blog mate…nice of you to share it and very well done on achieving what you have from scratch,very impressive,only disappointment,no wiring diagrams/links for the leisure batteries…but i am a fussy git…thanks for sharing….
Glad you enjoyed it. The
Glad you enjoyed it. The wiring is very simple. I will put together a diagram one day.
Battery to battery, to fuse box, to each 12v item. Split charge relay connectes the engine battery to the leisure batteries. A solar panel also charges the leisure batteries.
Just a few questions….
How much did this trip cost you in fuel Darren ?
we’re planning on doing sumit similar next year. Also, when you mentioned about silver windows giving you attention…what kind of attention ?
Oh, did you wish you had a heater of some kind at any point during the winter months ???
thanks
Joss 🙂
Hi Joss My trip cost about
Hi Joss
My trip cost about €1,300 in fuel. You can see the figures from my costs chart.
https://www.campervanlife.com/blog/darren-lambert/costs-of-my-trip
I must have forgot to record a few fuel stops.
I cruised around at 50 mph most of the time. I wasn’t in a rush. I half filled the tank when in hilly areas to reduce weight and increase mpg.
The silver windows stood out more than black windows would off. So I would just go for black windows next time.
A didn’t have a heater. Most of the time it wasn’t a problem. But some days it was cold, and some nights I had to sleep with all of my clothes on to stay warm. No a big deal, but I have a Propex heater in my new van (£450), mainly so that I can use it all of the year round in the UK and other places. There are cheaper options available to heat vans though.
my conversion, me and my future…
Hi Darren.
You may be just the person I need some advice from.
I converted my beloved LDV Convoy investing a lot of time and effort and joy in doing so and, like you say, it is much fun and very rewarding indeed!
My problem is, I would like to escape the rat race now, im fed up of this country and this climate. I would preferably like to go to spain or portugal.
My wish is to set off with almost everything i will need and live in the van wherever i may be i.e. on the road or offroad somewhere in southern spain or portugal. However, I have been reading that its not that easy due to new laws etc. etc.
My questions are: can i keep the van registered in uk even if im not in the uk? can i keep it insured in the uk to cover me for however long i want to stay away? What about mot etc.?
I am in rather a hurry as i have about 1000 pounds to go with and im looking at setting off on the 1st of november latest.
I am getting mot check and possible renewalk this friday but i havent a clue what else i need to bear in mind regarding the legality in those countries as to what i want to do. As you have done this all before, please enlighten me as i am terrified that i won’t be able to go at the moment.
Thank you kindly, i must take some photos of my conversion for you to see!
P.s. are you in the UK? Im just visiting my sister in london before i go but maybe if you arent that far away i could pop round for a chat?
Anyway, thanks for any info.
All the best,
Hugh.
Hi Hugh
Great to hear you are
Hi Hugh
Great to hear you are up for the adventure. I am sure you will have a great time.
I suspect the new laws make it sound more difficult than it is. Once you get on the road I am sure you will find lots of great places to stop and stay.
If you keep the vehicle registered in the UK then it must have a yearly MOT, for which the vehicle must be in the UK to have the MOT. So you must bring it home once a year to have the inspection.
The vehicle must also be taxed. Some people might tell you that you don’t need the tax disc whilst you are abroad. While no-one such as the Police might check this, you do actually have to have it to ensure your vehicle is legal.
You can find campervan insurance that will allow you to travel for 365 days abroad each year.
If you want to keep the vehicle abroad for longer than a year then look into registering your van in Portugal. I know people have done this. The road tax is much cheaper than in the UK.
I think registering the van in France or Spain is more difficult and expensive.
As long as your vehicle is legal in the UK, it will be legal in EU countries. So you need the MOT, tax and insurance.
Some countries demand that other accessories are carried, such as a spare bulb kit, a red warning triangle and a fluorescent jacket for each passenger.
I would recommend getting these bits as it means you are covered no matter where you go. These bits are cheap in French supermarkets, and some places in the UK. I’d recommend getting 2 red warning triangles, and a fluorescent jacket for each person in the vehicle. If ever you are stopped by the police and asked to get out of the vehicle, put the jacket on before you get out. The French police have caught people out with this before.
Don’t be worried. It’s easy to get everything ready before you go. Once you are on the road it will be much easier than you think, and a lot of fun!
Unfortunately I am in Cornwall, so a long way from London. Maybe next time?
All the best
Darren
Way cool!
Love the write up and your ingenuity! Inspired by the VW vans (though not having the lucre to get one) I’ve been thinking about converting a Sprinter here in the US. Thanks for the inspiration!
Awesome!
Thanks for being an inspiration, ur van looks great and im looking to do this next year when i get back from travelling… its made me really excitied to know its totally possible! keep living that dream!
Frenchy xxxx
Thanks
Glad you like it.
Have
Thanks
Glad you like it.
Have fun on your travels
Awesome
Hi Darren,
Just been reading through your blog… its really inspiring and something im looking to do when i come back from travelling next year… thanks for the inspiration and keep living that dream! 🙂 xxx
You are a legend!
Thanks for posting all your advice, it is incredibly useful and will hopefully push me into converting a van to a camper (for surfing trips around Europe)
Peace.
No problem. I hope you do
No problem. I hope you do it.
I have just bought another van to do it all again!
Seating and surfing
With your seating that unfolds into a double bed, what did you do to support the the boarding when the bed was unfolded.
Also, I have an 8’6 surf board, using your design would it fit to the wall? Or would I need to get a MWB to do this?
For the bed I got a fence
For the bed I got a fence post, about 5cm x 5cm, and cut it into 5 equal lengths. Then I put these posts under the folded out bed area. 1 in each corner and 1 in the middle. During the day the posts where just stacked into the cupboard. Cheap, easy and very hard to break. There is a pic below which should help.
I stored a mini-mal (7′ 6″) strapped to the ceiling. There were a few more inches to play with, but not another foot.
However if you stored it across the ceiling area, pointing towards where the passengers head would be I think it might fit.
I am now converting a MWB and need the extra length for a 9 foot plus longboard.
All the best
post
love the web page pal good on you. just wondering what did you do about post when living in the van for 9 months. i am considering doing it and touring france for the summer. but am concerned about getting bank statements/van documents etc.
pete
Pete, I had all my post sent
Pete, I had all my post sent to my parents house. They opened it and told me about anything important.
You could do the same with a friend also.
Any important documents my dad used to scan and email to me. I spend time backpacking in Asia regularly and he does the same when I am there.
Also, there is the Poste Restante. Post offices around Europe allow you to receive mail there. So if you are in a town for a whole (weeks) you could get important stuff sent to the post office.
Go for your trip. It’s a great experience. Am doing another van now.
Hiya Darren, What a fantastic
Hiya Darren, What a fantastic blog. Very interesting and informative. Also inspiring. Starting to do the same with an imported Toyota Estima. Best thing about all this is I,m having a fantastic time trying new things in the Estima. Laughing my ass off even if they dont work. Havent lost any money and have everything to gain. Keep up the good work and live free!
Good to hear you are inspired
Good to hear you are inspired to do the same.
I am doing another van now and am enjoying it more than last time. Best of luck and happy vaning!
Great Setup
Like how you ply lined the back. Were you able to get a pretty good r value using the batt insulation? Did it help keep vehicle at temp when camping?
Did you vent interior some way or just crack a window? Does humidity or stale air build up if not?
The insulation worked well.
The insulation worked well. It kept the van warm when camping in Portugal and Spain during winter. I’ve since learn’t than loft insulation is not the best solution, as it can give of particles that are not good to breath in, and it can hold moisture against the metal sides of the van. On my new van I am using Celotex or Kingpsan insulation boards.
I didn’t ventilate the van, and it wasn’t a problem. However, if camping during the summer ventilation is required as the heat will build up. Humidity was not really a problem. I did condensation at times, such as in the mornings, but this quickly cleared once I was up and the door was open for a while. I would recommend fitting some sort of ventilation. The rotating roof vents are a great idea.
Hi Isabelle
Hope you’ve had a
Hi Isabelle
Hope you’ve had a great time in SE Asia. Where abouts did you travel?
Glad you’ve found the website useful.
All the best
Darren
Really impressive!
Hi Darren,
I am travelling in south-east Asia at the moment and found your site when I was looking for campervans. I thought I might spend the summer travelling around the coast of the UK and I think a campervan would be great fun.
You’re website is great and very informative.
Thanks and best wishes,
Isabelle
stealth camping
Hi,I live in the uk and have bought a large van,and would like to know how you got on touring the coast of Brittain.I would like to do this on my own with my little dogs.I am particularly worried about personal safety,Also where can you fill up with water etc without going on a camp site
greatsite
great site mate and I love your tale of addventure and how you converted the van, ONLY ONE LIFE ENJOY IT…HAZ LO!
Thanks mate.
Gotta enjoy life
Thanks mate.
Gotta enjoy life 🙂
camper conversion
Hallow Darren. You did a great job on your conversion. I am trying to find parts and fix my own. I have a 1990 Chevy Conversion Van, UMC. I can not seem to find info on any other like it anywhere. I have searched for an owners manual for a long time now without luck. The left side cabinets fell down. Actually the bottom is hanging and the front is in another peace with the doors still attached. The studes are still hanging. One one each side. What do you think would be the best method of fixing them back properly?
Hi Glad you like the site
Hi
Glad you like the site 🙂
L shaped metal brackets are normally great for this sort of thing. They are easy to screw into any wood, and are very strong.
Perhaps you can post a picture of the cupboards, it would make it easier to offer suggestions.
hello!
Hi Darren,
First of all, thank you for the tips on where to camp in Spain, they will be useful to use as we continue our already 3 month long journey through europe in our converted Mercedes Vario. We bought the truck in Berlin (her name is Heidi) and converted her with the bare necessities (sink, bed, counter, seats). It has been an incredible journey so far as we have covered 12,000 km already. If anybody is looking to purchase a used Mercedes Vario, I highly recommend looking in Berlin. We came across many that were in very good condition. There is also a lot of free camping there, it is not hard to find a place to park with a group of campervans. Anyway, thanks for all the information! and bonne route!
cost
Hi there, love what you have done, i’ve been thinking about doing the same but with a ford transit(only as i like my fords)I was just woundering how much this project cost you from start to finish, not including the van..? and did you have any plans to work from.? many thanks Andy
Thanks Andy.
It cost me about
Thanks Andy.
It cost me about £1,200 excluding the van. On reflection I could have save money here and there.
But next time I will probably spend less.
I made some rough plans. But basically started building the most important bits first. The seating/bed was first, as I had bought cushions, and it needed to fit well. Then the storage fitted around that.
Cheers
Darren
Thanks
Thanks Jamie. Hope your conversion goes well. Cheers
Great project
Well done mate – what a brilliant project. Im inspired to do one myself… Thanks for doing the blog.
Hi Rob
Good to hear about
Hi Rob
Good to hear about your conversion. Mini-bus is a great idea.
I installed 3 leisure batteries. I charged them using a standard split-charge-replay from the engine battery, so they charged when the engine was running. This is a standard thing to do.
You can also just fit a big switch between the batteries, and switch it when the engine is running. But you must switch it back when the engine is stopped, to prevent the engine battery running flat. This is a common thing on boats with engines.
From the batteries I added a fuse box, and from that it was simple to add anything to the circuit. The fridge was just connected to the fuse box with an appropriate fuse. As was the CD player, lights, etc.
I don’t have any diagrams, but these links should help.
http://www.campervanconversion.co.uk/campervan-electrics.html
I had 3 batteries, but it’s the same principal for 1 or 3 batteries.
Thats a great help, thanks. I
Thats a great help, thanks. I have nearly finished the wood work in the van and I am really looking forward to the finished project and to post up a blog.
One thing I would change already is to use 9mm ply instead of mdf. 🙂
Rob
LDV
Hi Darren,
Me and the mrs have just bought a Long wheel base high roof LDV minibus to convert. We will black the windows out for a more private stealth camper look. Where can I grab info on the electrics side of what you have done, I E diagrams as I am a novice with electronics? I can wire in a cd player etc and I am from an engineering background and can turn my hand to most things, I just need to understand the fridge battery charging etc.
Awesome comversion with such a small van its inspiring!! Well done my friend
Rob
Camping
Looking for a good diesel engined motorbike, and a double walled tent. I camped across Canada, park site to park site a few years back with a diesel Jetta, but didn’t need the encumbrance of a car. Good oilers, a heatable tent, and a visit or two to the “Safeway” stores are all you really need, that and a good digital camera and some computer access for photo downloads. Biking ought to make it a closer to nature experience, hiding behind a windshield sort of civilizes things too much, and to go by horse now-a-days might be inconvenient.
I think all insurance
I think all insurance companies would consider your van modified.
I insured with CIS. They only insured mine as a van, and not a camper. It was still registered as a van with DVLA.
I didn’t mention about carrying gas. Never though of it.
insurance (yawn)
bought a sprinter which was alredy converted with a water tank and a gas hob, which I’m assuming mean its been modified? Anyway,just wondering who you insured with, and what they saud about you carrying gas?
It’s drving me mental trying to get it insured!
Cheers,
Nara
campervan
well done, hats off to you mate and keep up the good work!
Go for it Rob. A campervan
Go for it Rob. A campervan needs very little to make it work. Too many people get caught up in ‘making it perfect’ that they never get around to making a camper.
Nice job and thanks
was talking about the van idea (2nd year of non action) and said just what ypu said – a matress, chair and stove is a better than nowt..so your story is an inspiration – i climb / mtb so the van is a perfect solution – and £50,000 quid for a commercial job is out of my league.
keep having fun dude
rob
It depends. I assume you are
It depends. I assume you are going to change it from a van to a camper van with the DVLA? You need to contact them and tell them. Normally you just have to fill out the registration form, send it back and they will issue you a new one.
Sometimes they want to inspect the vehicle. It all depends on what they say.
Contact your local DVLA office, as they are normally the most helpful.
hi there bud was wondering if
hi there bud was wondering if you know if after a conversion you need to get your van/camper specially tested to make it legal. cheers. cracking job.
re: ups and downs
thanks for a reply.
All the ideas here are very reasonable, but one thing I wouldn’t agree is having a very high permanent bed, because it doesn’t fit with the general ideology of room-saving, as it cannot be used then for anything else but sleeping. in your previous van it was reasonable, as you could convert it to sofa.
my current plan is to have a double bed (~180x190cm) at the end, while 1/4 square corner of the bed would be convertible into table. I know it’s already stealing 2/3 of the floorspace of the MWB.
Having now only two spare square meters left for everything else, I couldn’t imagine having a separate hard-walled room for a shower, so I’m thinking of a soft-walled instead :). a shower tray (high-walled) on the floor and shower curtain all around, ends zipped together… though I just came up with this and I have no idea what may be the drawbacks.
Ups and downs
Hi AP
I know windsurfing requires a lot more gear, so you will need a bigger van.
I met several people who were into windsurfing. They kept all of their gear on one side of the van. I think the best idea is to have a high-top van, with the seating down one side, like in mine. Then store equipment above the seating area. You never stand at the seating area, only sit there, so you don’t need much head space. Which allows you to store lots of gear there.
Some surfers also store their gear underneath the seating area, as this provides a large un-broken storage area. You could do the same for windsurfing gear.
It was fairly comfortable, but not ideal.
Sleeping was fine as it had a big bed.
Cooking was OK. I had to plan preparation, as their wasn’t a lot of spare room.
Eating was OK. I didn’t have a table, so had to eat with my plate on my lap. I did have a fold-out camping table, which was OK.
Resting was fine, there was plenty of seating for 1.
I took my wetsuit of straight away, and hung it outside (away from the van to prevent rusting).
The ceiling height was too low for standing, but it wasn’t a major issue.
There are several important things to consider:
1. How long will you be living in the vehicle. If its a short time you can compromise on the space you have, and things such as headroom. If it’s a long time (more than a few months) you should make sure everything is comfortable. This means enough headroom to stand, and enough floor space to spread out a bit.
2. The weather – If you will be living in the van in summer you will probably spend more time outdoors than in. So inside room is less important then, but being able to cool the inside at night is important during the summer. During the winter you need to have more inside room, as you’ll be inside when it rains, etc. But night times are cooler, so make sure you have nice warm bedding.
3. How many people will be living in the van? If more than one then you need more room.
I intended to use the van at weekends, and then live in it for two months. The short wheelbase, medium height van was perfect for that. Easy to park, cheaper to buy and run. But, I ended up staying for nine months, so the van was a bit small for that amount of time. But I managed quite well.
When I do the trip again, assuming it was for nine months I would:
1. Get a high-top van so I can stand up. You can also use the extra vertical space for storage.
2. Probably use the can seats to make the dinning/living are by having them spin around to meet the seating area in the back.
3. Having a dining table.
4. Have a bigger kitchen area in the back.
5. Try and squeeze in a small toiler/shower room. It’s easy to make a very water efficient shower, or at least have somewhere to wash yourself from a bucket without soaking the inside of your van.
6. Oh, and I’d probably get a medium wheelbase to fit this all in.
To make a quick and easy camper: I would build a permanent double bed in the back of the van, but very high up. This allows for lots of storage under the bed, including surfboards, tools, etc. I can then get to this by opening the back doors. It doesn’t matter it is high when sleeping. This is an easier, quicker, cheaper approach to mass storage and a nice bed. This does leave less room for other things, but you have to choose what is important. You can also get to things from the front of the van.
I would when put a simple kitchen area in the front. Seating can be added in various ways, depends on budget and requirements.
If you want a camper, go for the conversion. I found it easier than i though, and a very rewarding thing to convert and then travel in.
I will definitely do it again, and it’ll be much easier second time around.
How did it feel?
Hi, I have been thinking for years about doing the same and recently decided that now it’s time. The difference is that I’m into windsurfing, so the amount of gear is three times as much 🙂 So I think of buying a bit bigger van: at least medium length, medium or high-top.
My question would be: how comfortable was it to live in there? what about sleeping, cooking, eating, just resting/reading, working, resting in a soaking wetsuit?
Did your floor plan and van size support well all these activities? for example, didn’t the ceiling height disturb you while standing up, cooking? you didn’t have a table next to the bed, how did you eat? etc…
Costs
Hi Boon
I kept a list of costs. It doesn’t include food, or entry to sights. Hopefully it will help you. Basically I was getting by on about €5 per day by free camping and always making my own meals. If I was driving a long distance then obviously you need to factor in fuel costs.
https://www.campervanlife.com/blog/darren-lambert/costs-of-my-trip
I’m a web designer, so I did some work as I travelled, but for people I already new. I don’t think finding work as you travel will be very easy. However you can always consider bar work in the busy summer times, fruit picking at harvest time, and a number of people get jobs working on yachts at the many marinas around Europe. It will help to have a Competant Crew or Day Skipper certificate if you intend to sail and work on the boats. If you don’t fancy going out to sea then try asking at the Marinas if any of the skippers need any work done, like cleaning or painting.
Glad you like the conversion, thanks.
Amazing conversion and glad
Amazing conversion and glad to see you did it all yourself.
One Question though
How much did it cost you to “bum” round Europe for 9 months and were there any money making ops while you were there (if this is deemed to personal feel free to disregard) I only ask as im currently saving up my cash for a van to convert and hopefully then go travelling and would like to know if its a sustainable lifestyle or if you need a lot of savings?
Thank you in advance and once again great conversion
Boon
A few months
Hi Dan
I bought the van in April 2007. I took my time and did the conversion over the summer whilst I was using the van as my surfing van. I left the UK for France in September 2007, so 5 months of conversion time. There was a very raining June in that summer, which slowed things down. If I were to do the same conversion again I could do it in 2 months I think, as I learn’t a great deal. A simpler conversion could be done in 2 weeks or a month.
How long to convert?
Hey Darren, thanks for collating all this information its very interesting and useful.
I was wondering how long it took to fully convert your van?
Cheers
Mate!!
Mate just read your Sprinter camper van and its well good! fair play.. you should go to the larmer tree festival!its well good.
Hi Paul
I can’t remember,
Hi Paul
I can’t remember, it’s been a while since I did that job. Are you looking for the feed to charge the battery, or the power source to switch the relay on?
Sprinter split charge relay connection to alternator
Hi Darren, great conversion. I have a `motocross’ type 311cdi conversion which I am converting from weekend/day use to permanent `full time’ use. I have installed a mains charger, now its the split charge relay. Have routed the Halfords split charge relay purple wire to the alternator, did you use the small wire that bolts onto the rear? Its the only small wire I can see, but when I took the wire off to check, the battery symbol didn’t go out on the dash (without starting the engine) with the ignition on? thanks for a great article. Paul
Hello,
I’d just like to
Hello,
I’d just like to mention that there is a self build motor home /campervan blogsite which also has a large photo archive of the stages of the conversion process and helpful advice. Try googling self build motor caravan club.It is a UK
based club.
Incidentalorly,I have a citroen dispatch van ,combi (this is the fully seated version with windows all round,like the ones you frequently see as taxis-also a good indicator of wheather a make /model is prone to faults).
In the past I have removed the seats and driven to cornwall(Newquay) for the odd long summer weekend to have a go at teaching myself to surf ,and trying to find an unobtrusive spot to park up for the night.Its not too bad if the weather is nice and dry, but its a bit rubbish if the weather is wet and windy and miserable and you are in that small space with your waterlogged ,sand covered surf gear !
Best wishes for Christmas and new year .Summer is only a few months away!!!
Hi Sonia
Whatever you do,
Hi Sonia
Whatever you do, you need to be honest with insurance companies. If you are involved in an incident and the insurance company find a discrepancy they might now cover you.
I actually insured my vehicle as a van. The insurance company were happy to do this, but nothing inside the back was covered under the insurance. The insurance company considered it simply as a van.
If this suits you then speak to a few insurance companies who are willing to insure you this way. If you want the contents insured as a camper then you will almost certainly have to have the vehicle re-registered as a camper van, which involves satisfying the authorities.
The cheapest and easiest way to add heating to a camper van is to use gas heaters. There are various types, but the simplest attach to gas bottles. When using any gas heating you are advised to keep a window open, as the fumes can be toxic.
Hope this helps.
Thanks for getting back to
Thanks for getting back to me, appreciate it 🙂
Insurance and heating! and thanks for top site
Thanks for informative site, have just bought VW transporter T4 to convert, your info v. helpful. Can I ask how you insured your van though? finding it hard to get cover as mine not going to be a true camper van (not intending bothering with proper cooker/running water/wardrobe, just seat/bed, storage, camping stove with extra home comforts of carpetted walls, lino floor, window and lovely curtains!) and also not for commercial use. Do i have to be totally honest with an insurer since I am not altering performance? Also do you have any tips for cheap heating solutions? I found Parabolic Heaters which are an attachment for small gas bottles on internet for about 25 quid but worried it might give off fumes…?
Cheers for ideas, Sonia
Hi Joe and Sarah.
You’re
Hi Joe and Sarah.
You’re welcome. I hope it inspires you to build your own and have as much fun as I did.
We have just bought a
We have just bought a sprinter to convert ourselves so it’s great and inspiring to read your story
thanks for sharing it 🙂
Thanks
Thanks for sharing this info, ideas and photos – great stuff!
just a note
Thank you for sharing your time and effort to educate and share with us.
Lee D.
Electrics
Hi Toby
Installing a leisure battery is fairly simple. You need to think about how you will charge the battery. Using a split charge relay is normally the best option. This will charge the engine battery and the leisure battery at the same time from the alternator. You could also add a solar panel to charge it when you are parked. Choose your fridge type carefully, as some use a lot of power. More modern fridges use much less power, but are very expensive. Gas fridges are still much cheaper to run. I will be writing lots of information about these topics soon. Hope this helps. Cheers
12v Battery for the fridge
Hi Darren,
Thanks for this page…I’ve found it quite inspirational, Ive got a hyundai panel van and was thinking of just installing a bed but might extend that now.
Anyway I like the sound of installing a leisure battery to run a fridge, is this a difficult job or is it totally stand alone from the vans altenator and electrics? Thanks
Toby
No trouble
I didn’t have any trouble getting onto campsites with my panel van. Before my trip I had heard that other people had been turned away, but I never had any problems.
Hello
Did you have any
Hello
Did you have any trouble staying in camp sites in Europe? I’ve heard that some sites don’t like converted commercial vans.
converting a van to a camper
i am planing to go camping around europe in the summer. I mite consider buying a van and converting it to a camper.After buying the van would any1 know the aprox buget i would need to make a van into a camper
You set the budget
Hi
You determine the budget. Set your budget and do you conversion based upon it. The cheapest option is a blow-up bed, camping chair, camping stove and water container. That lot would cost about £50/$100.
If you get a few Ikea furniture units and perhaps make a pull out bed then you’ll need about £300/$600.
A full conversion with fitted furniture will cost from £1000/$2000 and more.
Like I said, determine how much you have to spend, then work around that budget.
Conversions are great fun and hugely rewarding.
Have fun
Darren